3. Multi-Point Touch
As mentioned
previously, Silverlight applications are generally based on the control
framework and single touch when interacting with controls. There are
parts of applications that may require multi-touch. Windows Phone 7
supports up to four touch points, which are available to both
Silverlight- and XNA Framework-based applications. Examples of
multi-touch in Silverlight would be image manipulation, zooming in or
out on a news article to adjust the font, and so on.
In the XNA Framework,
multi-touch is essential, since game-based user experiences are
generally highly customized. One example of multi-touch in the XNA
Framework are having one thumb manipulating a virtual accelerator and
the other thumb manipulating a virtual brake in a driving game. Another
example is one thumb manipulating a virtual joystick and the other thumb
touching buttons to jump or shoot.
3.1. Controls
A couple of controls that are part of the Windows Phone 7 development platform include support for multi-touch. The WebBrowser control supports pinch/zoom and pan gestures. Another control that has built-in support for multi-touch is the Bing Maps control, which also supports pinch/zoom and pan gestures.
The other control that is more generic than the WebBrowser and Bing Maps controls is the ScrollViewer panel control, which supports flick and pan gestures for contained content. Once the solution is created, drag a ScrollViewer control onto the ContentPanel Grid control in Expression Blend. Reset the Height and Width on the Image control to Auto. Also reset layout on the ScrollViewer so that it fills the ContentPanel.
Drag an Image control onto the ScrollViewer control. Set the Source property of the Image control to point to the France. jpg image in the images folder of the ScrollViewer solution. Set the Stretch property on the Image control to None so that it expands beyond the screen bounds to full size. On the containing ScrollViewer control, set the HorizontalScrollBarVisibility property to Auto from Disabled. We want to be able to pan and flick the image in all directions.
Once layout is configured
property for the controls as detailed in the previous paragraphs, we are
ready to test. When you run the application, you can see that you get
pan and flick gestures "for free," provided by the ScrollViewer control. In the next couple of sections I cover multi-touch programming, gestures, and manipulation events.
3.2.3.2. Raw Touch with Touch.FrameReported
The mouse events covered in
the previous section may work fine for many cases, but may feel a bit
clunky. In this section we will implement the finger-painting
application using Touch.FrameReported for more fine-grained raw touch development.
We start with a copy of the previous finger painting application but change the Page class from FingerPaintingPageMouseEvents to FingerPaintingPageTouchEvents to prevent compilation errors with duplicate names. We keep both pages in the SinglePointTouch project, though System.Windows.Input.Touch supports multi-touch, which is an advantage over the mouse events. The next step is to remove the MouseMove event handler from the Rectangle and comment out the Rectangle_MouseMove event handler in the code behind.
In the PhoneApplicationPage_Loaded event, wire-up the FrameReported event like this
System.Windows.Input.Touch.FrameReported += new TouchFrameEventHandler(Touch_FrameReported);
To prevent exceptions when navigating back and forth to the page, the event is disconnected in the unload event here
private void PhoneApplicationPage_Unloaded(object sender, RoutedEventArgs e)
{
  System.Windows.Input.Touch.FrameReported -= Touch_FrameReported;
}
The Touch_FrameReported event is where the touch action happens and directly replaces the Rectangle_MouseMove event from the previous example. The FrameReported event TouchFrameEventArgs class provides a rich set of properties to provide fine-grained control over touch development. Table 1 provides a summary of its properties and events.
Table 1. Available InputScope Options
| Member | Description |
|---|
| GetPrimaryTouchPoint | Returns the primary or first finger touch point for the reported frame as a TouchPoint class value. |
| GetTouchPoints | Returns a collection of all of the TouchPoint class objects from the reported frame. |
| SuspendMousePromotionUntilTouchUp | Disables
promoting the low-level touch events from becoming mouse events. Useful
if you want to override mouse event behavior in an application. |
| Timestamp | Determines how much time has passed between touch events. |
Unlike with the mouse events StylusPoint class, the TouchPoint class does not support PressureFactor values, so Opacity is not varied by pressure. The TouchPoint class does support a Size
value for the touch action but the size resolves to a very small value
regardless of whether drawing with a small finger or larger finger,
making the Size value less useful. The following is the final Touch_FrameReported event handler:
void Touch_FrameReported(object sender, TouchFrameEventArgs e)
{
  foreach (TouchPoint p in e.GetTouchPoints(DrawCanvas))
  {
    if ((InDrawingMode) && (p.Action == TouchAction.Move))
    {
      Ellipse ellipse = new Ellipse();
      ellipse.SetValue(Canvas.LeftProperty, p.Position.X);
      ellipse.SetValue(Canvas.TopProperty, p.Position.Y);
      ellipse.Width = _touchRadius;
      ellipse.Height = _touchRadius;
      ellipse.IsHitTestVisible = false;
      ellipse.Stroke = ((ColorClass)ColorListBox.SelectedItem).ColorBrush;
      ellipse.Fill = ((ColorClass)ColorListBox.SelectedItem).ColorBrush;
      DrawCanvas.Children.Add(ellipse);
    }
  }
}
Notice that this code has an additional check on the Boolean variable InDrawingMode. The value of InDrawingMode is set to false when showing the color selector ColorListBox. This is because the Touch.FrameReported
event fires no matter what control has focus. So without additional
checks, selecting or scrolling colors would generate additional touch
events on the DrawCanvas Canvas object. Raw touch with Touch.FrameReported is truly raw touch processing.
The mouse events have a nice benefit over Touch. FrameReported. The mouse events generate StylusPoint objects, which include a PressureFactor value instead of the TouchPoint objects for Touch.FrameReported.
This allows varying the Opacity, for a better drawing experience.
However, for other touch-related programming where Gestures or
Manipulations cannot provide needed functionality, raw touch with Touch.
FrameReported is recommended over mouse events
3.3. Multi-Touch with Raw Touch
One capability that Touch.FrameReported provides over mouse events is multi-touch capabilities via the TouchPoint class. The TouchPoint class has the following two members that allow tracking of state and history:
Action: Identifies whether the touch action is Down, Move, or Up.
TouchDevice: Contains an ID that represents the "finger" as it moves about the screen.
With these two properties it
is possible to track the state of the touch as well as associated
history as the user moves their finger around the screen. The MultiTouchwithRawTouch
project is a simple program that tracks up to four touch actions by a
user. Essentially you can place four fingers on the screen and watch the
Rectangle objects follow your fingers on the screen. The XAML for the
project is a generic page that has Rectangle objects dynamically added
to a Canvas panel added to the default ContentPanel Grid. Listing 6 contains the source code for the code-behind file.
Example 6. MultiTouchwithRawTouch MainPage.xaml.cs Code File
using System.Collections.Generic;
using System.Linq;
using System.Windows;
using System.Windows.Controls;
using System.Windows.Input;
using System.Windows.Media;
using System.Windows.Shapes;
using Microsoft.Phone.Controls;

namespace MultiTouchwithRawTouch
{
  public partial class MainPage : PhoneApplicationPage
  {
    List<TrackedTouchPoint> trackedTouchPoints = new List<TrackedTouchPoint>();

    // Constructor
    public MainPage()
    {
      InitializeComponent();

      Touch.FrameReported += new TouchFrameEventHandler(Touch_FrameReported);
    }

    void Touch_FrameReported(object sender, TouchFrameEventArgs e)
    {
      foreach (TouchPoint tp in e.GetTouchPoints(DrawCanvas))
      {
        tp.TouchDevice.
        TrackedTouchPoint ttp = null;
        var query = from point in trackedTouchPoints
                    where point.ID == tp.TouchDevice.Id
select point;
        if (query.Count() != 0)
          ttp = query.First();

        switch (tp.Action)
        {
          case TouchAction.Down: ttp = new TrackedTouchPoint();
            ttp.ID = tp.TouchDevice.Id;
            if (trackedTouchPoints.Count == 0)
            {
              ttp.IsPrimary = true;
              DrawCanvas.Children.Clear();
}
            trackedTouchPoints.Add(ttp);
            ttp.Position = tp.Position;
            ttp.Draw(DrawCanvas);
            break;

          case TouchAction.Up: ttp.UnDraw(DrawCanvas);
            trackedTouchPoints.Remove(ttp);
            break;
          default:
            ttp.Position = tp.Position;
            ttp.Draw(DrawCanvas);
            break;
        }
      }
      CleanUp(e.GetTouchPoints(DrawCanvas));
    }

    private void CleanUp(TouchPointCollection tpc)
    {
      List<int> ToDelete = new List<int>();
      foreach (TrackedTouchPoint ttp in trackedTouchPoints)
      {
        var query = from point in tpc
                    where point.TouchDevice.Id == ttp.ID
                    select point;
        if (query.Count() == 0)
          ToDelete.Add(ttp.ID);
      }

      foreach (int i in ToDelete)
      {
        var query = from point in trackedTouchPoints
                    where point.ID == i
                    select point;
        if (query.Count() != 0)
          trackedTouchPoints.Remove(query.First());
      }
      if (trackedTouchPoints.Count == 0)
      {
        DrawCanvas.Children.Clear();
      }
    }
  }

  class TrackedTouchPoint
  {
    public TrackedTouchPoint()
    {
      Rect = new Rectangle() { Height = 50, Width = 50 };
      Position = new Point(0, 0);
      IsPrimary = false;
      BrushColor = new SolidColorBrush(Colors.Yellow);
    }

    private Rectangle Rect { get; set; }

    public int ID { get; set; }

    public Brush BrushColor
    {
      set
      {
        Rect.Fill = value;
      }
    }
    public Point Position { get; set; }

    public bool IsPrimary { get; set; }

    public void Draw(Canvas canvas)
    {
      if (IsPrimary)
        BrushColor = new SolidColorBrush(Colors.Blue);

      Rect.SetValue(Canvas.LeftProperty, Position.X);
      Rect.SetValue(Canvas.TopProperty, Position.Y);
      if (Rect.Parent == null)
        canvas.Children.Add(Rect);
    }

    public void UnDraw(Canvas canvas)
    {
      canvas.Children.Remove(Rect);
    }
  }
}
|
Raw touch with
Touch.FrameReported gives full access to every touch event; however, it
is cumbersome to work with when you just need to detect gestures or a
set of gestures. For mutli-touch programming Touch.FrameReported is not
recommended. The next couple of sections cover gesture detection in both
the XNA Framework and Silverlight as well as manipulations, which are
recommended for multi-touch.
3.4. Programming with Gestures
A gesture is a one or two
finger action that is a pre-defined touch interaction. Gestures on
Windows Phone 7 are similar to gestures that are defined on Windows 7,
iPhone, Android, or pretty much any other touch device. What makes
gestures useful is their consistency, which means that they should not
be altered or "enhanced" in a way that will confuse users.
I cover single-touch and raw
touch in the previous section titled "Single-Point Touch," but I did not
speak to it in terms of gestures. Single-touch gestures consist of the
following interactions:
Tap: Select an object in a ListBox, touch to click a button, or text to navigate to another screen.
Double Tap:
Successive taps in a row that happen with a time duration such as one
second and are therefore recognized as a double-tap, not two single-tap
gestures.
Pan: Use a single feature to move an object across the screen.
Flick:
Similar to a pan gesture except that the finger moves quickly across
the screen, acceleration is detected, and the object moves with inertia
relative to the amount of acceleration applied.
Touch and Hold:
Touch on an area of screen for a period of time, say a second, and a
touch and hold gesture is detected. Used to open context menus.
The two-finger gestures are
Pinch and Stretch. The pinch gesture consists of placing two fingers on
the screen and moving them closer. Pinch is used to zoom out as well as
to make an object smaller. The Stretch gesture consists of placing two
fingers on the screen and moving them further away. Stretch is used to
zoom in as well as to make an object larger. In the next two subsections
I cover how to support gestures in Windows Phone 7 Applications.
3.4.1. Multi-Touch with XNA Framework Libraries
The XNA Framework on Windows Phone 7 includes the Microsoft.Xna.Framework.Input.Touch
namespace. This is a non-graphical, non-rendering namespace, so it can
be leveraged in both Silverlight and XNA Game Studio. The primary class
for the namespace is the TouchPanel static class, which receives touch input that is automatically interpreted into a gesture for developers.
To process gestures, developers call TouchPanel.IsGestureAvailable to determine if a Gesture is pending. If one is, developers then call TouchPanel.ReadGesture. The Microsoft.Xna.Framework.Input.Touch
namespace includes an enumeration named GestureType that identifies the
supported gestures, DoubleTap, Flick, FreeDrag, HorizontalDrag,
VerticalDrag, Hold, Pinch, and Tap.
Project GesturesTouchPanelXNA demonstrates how simple it is to use the TouchPanel class to determine gestures. In the Initialize() method of Game1.cs, the code enables all possible gestures.
TouchPanel.EnabledGestures = GestureType.DoubleTap | GestureType.Flick |
  GestureType.FreeDrag | GestureType.Hold | GestureType.HorizontalDrag |
  GestureType.None | GestureType.Pinch | GestureType.PinchComplete |
  GestureType.Tap | GestureType.VerticalDrag | GestureType.DragComplete;
We want to draw text to the screen in the XNA Framework project so we right-click on the GesturesTouchPanelXNAContentContent project and select Add =>
New Item...and then select Sprite Font. You can edit the FontName tag
to be a different font name as long as you have rights to redistribute
the font. It is changed to Pescadero
because that is one of the fonts available for redistribution via XNA
Game Studio. For more details on font redistribution, visit http://msdn.microsoft.com/en-us/library/bb447673.aspx. The project declares a SpriteFont object named spriteFontSegoeUIMono to represent the font.
In the LoadContent() method of Game1.cs, this code loads the font and defines a position in the middle of the screen to draw the font.
spriteFontSegoeUIMono = Content.Load<SpriteFont>("Segoe UI Mono");
spriteFontDrawLocation = new Vector2(graphics.GraphicsDevice.Viewport.Width / 2,
  graphics.GraphicsDevice.Viewport.Height / 2);
In the Update() method, here is the code to check for a gesture:
if (TouchPanel.IsGestureAvailable)
{
  gestureSample = TouchPanel.ReadGesture();
  gestureInfo = gestureSample.GestureType.ToString();
}
The gestureInfo variable is printed to the screen using the imported font with these lines of code in the Draw() method.
spriteBatch.Begin();
// Draw gesture info
string output = "Last Gesture: " + gestureInfo;

// Find the center of the string to center the text when outputted
Vector2 FontOrigin = spriteFontSegoeUIMono.MeasureString(output) / 2;
// Draw the string
spriteBatch.DrawString(spriteFontSegoeUIMono, output, spriteFontDrawLocation,
  Color.LightGreen,0, FontOrigin, 1.0f, SpriteEffects.None, 0.5f);
spriteBatch.End();
Run the application on a device
and gesture on the screen to see the gesture recognized and the name of
the gesture action drawn onscreen. Now that we have an easy way to
detect a gesture, let's use it to do something useful.
The GestureSample class provides six properties to provide useful information regarding the gesture, GestureType, Timestamp, Position, Position2, Delta, and Delta2. You know what GestureType does from the discussion in the preceding paragraphs. Timestamp indicates the time of the gesture sample reading. The TimestampVector2 values related to the position of the finger on the screen. Position represents the first finger. Position2 represents the second finger if a two-finger gesture. The Delta and Delta2Timestamp,
in that they indicate the changes in finger position relative to the
last finger position, not between fingers if a multi-touch gesture. Table 2
values are continuous for readings to they can be subtracted to
determine how much time passed between readings. The other four values
are values are like relates gestures to the applicable fields with relevant notes.
Table 2. Gestures and Applicable GestureSample Members
| Gesture | Applicable Members | Notes |
|---|
| Tap | Position | |
| DoubleTap | Position | |
| Hold | Position | |
| FreeDrag | Position, Delta | |
| VerticalDrag Position, Delta | Delta values are constrained to the direction of movement, either vertical (X=0) or horizontal (Y=0). | |
| HorizontalDrag | Position, Delta | |
| DragComplete | N/A | All vector2 values set to zero. |
| Flick | Delta | The Delta member represents flick speed (and direction) as pixels per second. |
| Pinch | Position, Position2, Delta, Delta2 | Position/Delta
represent the first finger.Position2/Delta2 represents the second
finger.Negative values indicate the Pinch gesture is moving fingers
closer together. |
| PinchCompete | N/A | All vector2 values set to zero. |
Debug info is added to write out the data from the GestureSample instance named gestureSample to help with development. The following is an example from the beginning of a Pinch gesture:
gesture Type:      Pinch
gesture Timestamp: 03:27:37.3210000
gesture Position:  {X:425.2747 Y:287.3394}
gesture Position2: {X:523.077 Y:366.6055}
gesture Delta:     {X:0 Y:0}
gesture Delta2:    {X:0 Y:0}
A short expanding Pinch
gesture results in about 30 gesture samples over just less than half a
second, providing a rich set of data to apply to objects as a result of
user touches. Run the sample and perform gestures on blank portions of
the screen to see how position and delta values change.
To make the sample
more interesting stickman figure manipulation is added to the
GesturesTouchPanelXNA project. The stickman figure responds to Hold,
Flick, Drag, and Pinch gestures. Figure 6 shows the simple UI but you will want to run this on a device to try out the supported gestures.
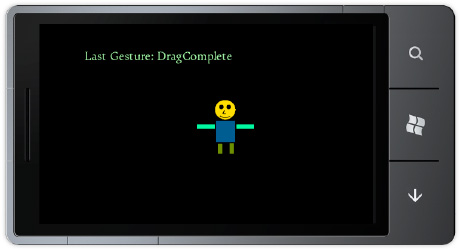
If you tap and hold (Hold GestureType) on the stickman, the figure rotates 90 degrees. If the stickman is flicked (Flick GestureType), the stickman will bounce around the screen and will eventually slow down. Tap on the stickman to stop movement. Finally, drag (FreeDragGestureType) to slide the stickman around the screen.
There is a little bit of XNA Framework development in the sample to create a basic GameObject
class to represent the stickman sprite. This keeps the game code clean
without using a bunch of member variables to track state in the Game1.cs file.Listing 7 shows the GameObject class.
Example 7. GameObject.cs Code File
using Microsoft.Xna.Framework;
using Microsoft.Xna.Framework.Graphics;

namespace GesturesTouchPanelXNA
{
  class GameObject
  {
    private const float _minScale = .4f;
    private const float _maxScale = 6f;
    private const float _friction = .7f;
    private const float _bounceVelocity = .9f;

    private float _scale = 1f;
    private Vector2 _velocity;
    private Vector2 _position;

    public GameObject(Texture2D gameObjectTexture)
    {
      Rotation = 0f;
      Position = Vector2.Zero;
      SpriteTexture = gameObjectTexture;
      Center = new Vector2(SpriteTexture.Width / 2, SpriteTexture.Height / 2);
Velocity = Vector2.Zero;
      TintColor = Color.White;
Selected = false;
}

    public Texture2D SpriteTexture { get; set; }
    public Vector2 Center { get; set; }
    public float Rotation { get; set; }
    public Rectangle TouchArea { get; set; }
    public Color TintColor { get; set; }
    public bool Selected { get; set; }
    public float Scale
    {
      get { return _scale; }
      set
      {
        _scale = MathHelper.Clamp(value, _minScale, _maxScale);
      }
    }
    public Vector2 Position
    { get { return _position; }
      set { _position = value ; } //Move position to Center.
    }
    public Vector2 Velocity
    {
      get {return _velocity;}
      set { _velocity = value; }
    }

    public Rectangle BoundingBox
    {
      get
      {
        Rectangle rect =
          new Rectangle((int)(Position.X - SpriteTexture.Width / 2 * Scale),
          (int)(Position.Y - SpriteTexture.Height / 2 * Scale),
          (int)(SpriteTexture.Width * Scale),
          (int)(SpriteTexture.Height * Scale));
          //Increase the touch target a bit
          rect.Inflate(10, 10);
        return rect;
      }
    }

    public void Update(GameTime gameTime, Rectangle displayBounds)
    {
      //apply scale for pinch / zoom gesture
      float halfWidth = (SpriteTexture.Width * Scale) / 2f;
      float halfHeight = (SpriteTexture.Height * Scale) / 2f;

      // apply friction to slow down movement for simple physics when flicked
      Velocity *= 1f - (_friction * (float)gameTime.ElapsedGameTime.TotalSeconds);

      // Calculate position
      //position = velocity * time
      //TotalSeconds is the amount of time since last update in seconds
      Position += Velocity * (float)gameTime.ElapsedGameTime.TotalSeconds;
// Apply "bounce" if sprite approaches screen bounds
      if (Position.Y < displayBounds.Top + halfHeight)
      {
        _position.Y = displayBounds.Top + halfHeight;
        _velocity.Y *= -_bounceVelocity;
      }
      if (Position.Y > displayBounds.Bottom - halfHeight)
      {
        _position.Y = displayBounds.Bottom - halfHeight;
        _velocity.Y *= -_bounceVelocity;
      } if (Position.X < displayBounds.Left + halfWidth)
      {
        _position.X = displayBounds.Left + halfWidth;
        _velocity.X *= -_bounceVelocity;
      }

      if (Position.X > displayBounds.Right - halfWidth)
      {
        _position.X = displayBounds.Right - halfWidth;
        _velocity.X *= -_bounceVelocity;
      }
    }

    public void Draw(SpriteBatch spriteBatch)
    {
      spriteBatch.Draw(SpriteTexture, Position, null, TintColor, Rotation,
        Center,Scale,
        SpriteEffects.None,0);
    }
  }
}
|
The vast majority of the GameObject
class is basic math calculations for checking screen boundaries,
velocity, position, and so on. The one item to point out is the handy
MathHelper static class that includes numerous helpful methods. The Clamp method is used to limit the zooming via the Pinch GestureType to be between a min and max scale value.
The other interesting code is the ProcessTouchInput() method in Game1.cs that is called in the Update()
method. The method checks for touches first in order to determine if
the stickman was touched on screen. To perform the check, each touch is
converted to a Point object mapped into the screen coordinates. Next, we create a Rectangle object that encapsulates the stickman. The Rectangle.Contains
method is passed in the Point object that represents the touch to
determine if the touch was within the bounding box of the stickman. If
the Point object is within the bounds of the Rectangle object, Selected is set to true on the StickMan
sprite and gestures are applied. Otherwise, if a gesture is performed
outside of the stickman, the gesture info is displayed to the screen as
before but the StickMan sprite is not affected. The following is the code to determine selection:
TouchCollection touches = TouchPanel.GetState();
if ((touches.Count > 0) && (touches[0].State == TouchLocationState.Pressed))
{
  // map touch to a Point object to hit test
Point touchPoint = new Point((int)touches[0].Position.X,
(int)touches[0].Position.Y);
if (StickManGameObject.BoundingBox.Contains(touchPoint))
  {
    StickManGameObject.Selected = true;
    StickManGameObject.Velocity = Vector2.Zero;
  }
}
A switch statement is added to the while (TouchPanel.IsGestureAvailable) loop. As a GestureType is identified, it is applied to the StrawMan sprite. The switch statement is shown in Listing 8.
Example 8. ProcessInput Method GestureType Switch Statement
if (StickManGameObject.Selected)
{
  switch (gestureSample.GestureType)
  {
    case GestureType.Hold:
      StickManGameObject.Rotation += MathHelper.Pi;
      break;
    case GestureType.FreeDrag:
      StickManGameObject.Position += gestureSample.Delta;
      break;
    case GestureType.Flick:
      StickManGameObject.Velocity = gestureSample.Delta;
      break;
    case GestureType.Pinch:
      Vector2 FirstFingerCurrentPosition = gestureSample.Position;
      Vector2 SecondFingerCurrentPosition = gestureSample.Position2;
      Vector2 FirstFingerPreviousPosition = FirstFingerCurrentPosition -
              gestureSample.Delta;
      Vector2 SecondFingerPreviousPosition = SecondFingerCurrentPosition -
              gestureSample.Delta2;
      //Calculate distance between fingers for the current and
      //previous finger positions.  Use it as a ration to
      //scale object.  Can have positive and negative scale.
      float CurentPositionFingerDistance = Vector2.Distance(
        FirstFingerCurrentPosition, SecondFingerCurrentPosition);
      float PreviousPositionFingerDistance = Vector2.Distance(
        FirstFingerPreviousPosition, SecondFingerPreviousPosition);

      float zoomDelta = (CurentPositionFingerDistance -
                          PreviousPositionFingerDistance) * .03f;
      StickManGameObject.Scale += zoomDelta;
      break;
  }
}
|
For the GestureType.Hold gesture, the StickMan's Rotation property on the sprite is altered by MathHelper.PiOver2 radians, which is equal to 90 degrees. For the GestureType.FreeDrag gesture, the StickMan's Position property is updated by the Delta value, which is a Vector2 in the direction and magnitude of movement since the last time a gesture sample was provided. For GestureType.Flick, the StickMan's Velociy is updated by the Delta as well, which in this case represents a flick speed that is added.
The GestureType.Pinch
gesture requires a bit more calculation, but it is fairly
straightforward.Essentially, the distance between fingers in screen
coordinates is calculated for the current finger position and previous
finger position. The differences are used to calculate scale factor.
Increasing finger distance is a positive scale factor. Decreasing finger
distance is a negative scale factor. If the distance greatly increases
(either to be bigger or smaller), that determines the size of the scale
factor.
Touch input and Gestures are a
key component to game development for Windows Phone 7. This section
covered a lot of ground from gesture recognition to applying gestures to
a game object, taking advantage of the gesture capabilities available
in the XNA Framework libraries. We will now cover how to work with
gestures in Silverlight.
3.4.2. Multi-Touch with Silverlight
We can take the
information above regarding XNA Framework multi-touch and apply it to
Silverlight. Because Silverlight and XNA Framework share the same
application model, you can share non-drawing libraries across
programming models. This is demonstrated in the GesturesTouchPanelSilverlight project. To get started, add a reference to the Microsoft.Xna.Framework and Microsoft.Xna.Framework.Input.Touch namespaces.
In the MainPage() constructor in MainPage.xaml.cs, add the following code to enable Gestures, just as before:
TouchPanel.EnabledGestures = GestureType.DoubleTap | GestureType.Flick |
        GestureType.FreeDrag | GestureType.Hold | GestureType.HorizontalDrag |
        GestureType.None | GestureType.Pinch | GestureType.PinchComplete |
        GestureType.Tap | GestureType.VerticalDrag | GestureType.DragComplete;
In XNA Game Studio, the game loop Update
method is called 30 times a second so it is a single convenient place
to capture touch input. In Silverlight there isn't a game loop. A
polling loop could be simulated with a DispatcherTimer that fires every
1000/30 milliseconds. This is the cleanest approach, because it exactly
simulates how the XNA Framework works.
Another method is to hook into
the mouse or manipulation events. I cover the manipulation events in the
next section so we use the mouse events instead. This will work fine
most of the time, but some gesture events fire in MouseLeftButtonDown and MouseButtonUp as well as MouseMove so you have to be careful if it causes you a bug if you are just tracking events in MouseMove, and so on. The following is the code to capture gesture events in Silverlight mouse events:
private void PhoneApplicationPage_MouseLeftButtonDown(object sender, MouseButtonEventArgs e)
{
  while (TouchPanel.IsGestureAvailable)
  {
    GestureActionsListBox.Items.Add("LeftBtnDown "+TouchPanel.ReadGesture().GestureType.ToString());

  }
}

private void PhoneApplicationPage_MouseLeftButtonUp(object sender, MouseButtonEventArgs e)
{
  while (TouchPanel.IsGestureAvailable)
  {
    GestureActionsListBox.Items.Add("LeftBtnUp " + TouchPanel.ReadGesture().GestureType.ToString());
  }
}
private void PhoneApplicationPage_MouseMove(object sender, MouseEventArgs e)
{
  while (TouchPanel.IsGestureAvailable)
  {
    GestureActionsListBox.Items.Add("MouseMove " + TouchPanel.ReadGesture().GestureType.ToString());
  }
}
Once the gestures are detected in the mouse events, you can perform similar programming using a Canvas
panel as with the XNA Framework ample to react to gestures. One
additional item to consider when comparing the XNA Framework and
Silverlight is the coordinate system. In the XNA Framework, all objects
are absolutely positioned relative to the upper left hand corner so the
math to calculate position is straightforward. In Silverlight, objects
can be placed within containers. For example, a Rectangle can have
margin top and left margin of 10,10, but be contained within a Grid that
has margin of 100,100 relative to the screen so coordinate mapping is
necessary to translate the touch location to an actual control position.
Another method to
detect gestures in Silverlight is available within the Silverlight for
Windows Phone Toolkit at Silverlight.codeplex.com. The toolkit includes
the GestureService/GestureListener components to detect gestures, so you will want to download the toolkit to test out the sample
Once the Silverlight for
Windows Phone Toolkit is installed, browse to the toolkit library and
add a reference. On my system it is located here: C:\Program Files (x86)\Microsoft SDKs\Windows Phone\v7.0\Toolkit\Nov10\Bin. The GesturesSilverlightToolkit project demonstrates how to use the GestureListener control. The toolkit library is added as a reference and made available in MainPage.xaml via an xml namespace import:
xmlns:toolkit="clr-namespace:Microsoft.Phone.Controls;assembly=
Microsoft.Phone.Controls.Toolkit"
A Rectangle object containing a GestureListener control is added to the ContentPanel Grid:
<toolkit:GestureService.GestureListener>
<toolkit:GestureListener />
</toolkit:GestureService.GestureListener>
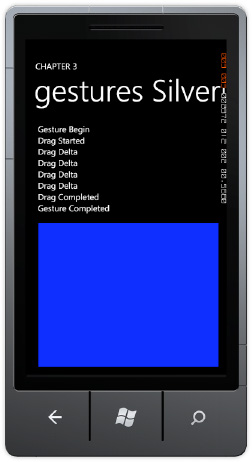
Figure 7 shows the events available on the GestureListener.
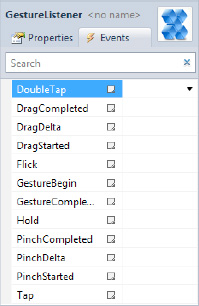
An event handler is added for all the possible supported gestures, Tap, DoubleTap, Drag, Flick, TapAndHold, and Pinch to the GesturesSilverlightToolkit project to allow you to explore the events. Figure 8 shows the test UI.
An important item to
note, each event has unique EventArgs to provide the information
developers need to apply the gesture to objects. As an example, the
FlickGestureEventArgs class includes Angle, Direction, GetPosition,
Handled, HorizontalVelocity, and VerticalVelocity members. The
properties are more tailored toward Silverlight development, which may
simplify gesture processing over using the XNA Framework libraries.
This concludes the discussion of gesture processing. The next section covers manipulation events.
3.5. Programming with Manipulation Events
Manipulations
permit more complex interactions. They have two primary characteristics:
Manipulations consists of multiple gestures that appear to happen
simultaneously. The other characteristic is that manipulations consist
of a set of transforms resulting from the user touch actions. The
Manipulation events are very helpful because they interpret the user
touch interaction into a set of transforms like translate and scale that
you as the developer can apply to objects onscreen.
Windows
Presentation Foundation 4.0 introduced Manipulation events to provide a
high-level touch programming model that simplifies touch programming
when compared to using low-level raw touch input. A subset of the
manipulation events is available in Silverlight for Windows Phone 7 with
some differences. WPF manipulation events support translation, scaling,
and rotation. Silverlight for Windows Phone does not include rotation.
Manipulation events
do not distinguish between fingers. The events interpret finger
movement into translation and scaling as well as an indication of
velocity to implement physics.
Windows Phone 7 includes three manipulation events:ManipulationStarted, ManipulationDelta, and ManipulationCompleted defined on the UIElement base class. Each manipulation event includes a custom EventArgs class with the following members in common:
e.OriginalSource: The original object that raised the event.
e.ManipulationContainer:
The container object or panel that defines the coordinate system for
the manipulation. This property will stay consistent through all three
events.
e.ManipulationOrigin: The point from which the manipulation originated. Indicates the location of the finger relative to the ManipulationContainer object. For two-finger manipulations, the ManipulationOrigin represents roughly the center point between the two fingers.
The events include unique EventArgs members as well, listed in the following:
ManipulationStarted: The ManipulationStartedEventArgs class includes a Complete method that completes the manipulation without inertia, and a Handled property to indicate that the routed event is handled so that other controls don't attempt to handle the event again.
ManipulationDelta: The ManipulationDeltaEventArgs class includes a Complete method. The IsInertial method indicates whether the Delta events is occurring during inertia. Other properties are DeltaManipulation and CumulativeManipulation, which represent the discrete (delta) and cumulative changes since ManipulationStarted resulting from the manipulation. The other EventArgs property is Velocities, which indicates the most recent rate of change for the manipulation.
ManipulationCompleted: The ManipulationCompletedEventArgs include a FinalVelocities and TotalManipulation properties. It also includes a Handled and IsInertial properties.
As we saw before with gesture development there is one"started" event followed by zero or more ManipulationDelta events, and then a ManipulationCompletedManipulationEvents project using the StickMan sprite from the "completed" event. To test manipulations, we created the GesturesTouchPanelXNA project. Figure 9 shows the UI.
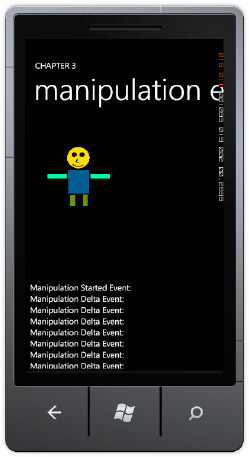
The project implements drag and scale via the ManipulationsDelta event. Here is the code for the ManipulationsDelta event.
private void StickManImage_ManipulationDelta(object sender,
ManipulationDeltaEventArgs e)
{
  ReportEvent("Manipulation Delta Event: ");
  Image image = sender as Image;
  CompositeTransform compositeTransform =
    image.RenderTransform as CompositeTransform;

  if ((e.DeltaManipulation.Scale.X > 0) || (e.DeltaManipulation.Scale.Y > 0))
  {
    double ScaleValue = Math.Max(e.DeltaManipulation.Scale.X,
      e.DeltaManipulation.Scale.Y);
    System.Diagnostics.Debug.WriteLine("Scale Value: " +
      ScaleValue.ToString());

    //Limit how large
    if ((compositeTransform.ScaleX <= 4d) || (ScaleValue < 1d))
{
      compositeTransform.ScaleX *= ScaleValue;
      compositeTransform.ScaleY *= ScaleValue;
    }
}
  System.Diagnostics.Debug.WriteLine("compositeTransform.ScaleX: " +
    compositeTransform.ScaleX);
  System.Diagnostics.Debug.WriteLine("compositeTransform.ScaleY: " +
    compositeTransform.ScaleY);

  compositeTransform.TranslateX += e.DeltaManipulation.Translation.X;
  compositeTransform.TranslateY += e.DeltaManipulation.Translation.Y;
  e.Handled = true;
}
The code modifies a CompositeTransform based on the DeltaManipulation values, Scale for Pinch gestures and Translation for movement. The CompositeTransformStickMan Image tag, as shown in the following: is declared in the XAML for the
<Image x:Name="StickManImage" Source="/images/StickMan.jpg"
   ManipulationCompleted="StickManImage_ManipulationCompleted"
   ManipulationDelta="StickManImage_ManipulationDelta"
    ManipulationStarted="StickManImage_ManipulationStarted">
<Image.RenderTransform>
   <CompositeTransform />
</Image.RenderTransform>
</Image>
The Silverlight for Windows Phone Toolkit GestureListener
control is the preferred method for detecting gestures in Silverlight
for Windows Phone. Manipulation events should be a second or third
choice if for some reason the GestureListener
or XNA Framework libraries do not suit your needs. For non-gesture
detection multi-touch development, the manipulation events are
recommended. Let's now shift gears to discuss other forms of application
input on Windows Phone 7.